


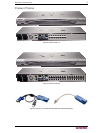

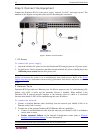

CHAPTER 3: INSTALLATION AND CONFIGURATION 11
Note: For target servers running Windows 2000 or XP, you may wish to create a user name that
will be used only for remote connections through Dominion KX II. This will enable you to keep
the target server’s slow mouse pointer motion/acceleration settings exclusive to the Dominion
KX II connection.
Windows XP and 2000 login screens revert to pre-set mouse parameters that differ from those
suggested for optimal Dominion KX II performance. As a result, mouse synchronization may not
be optimal for these screens. If you are comfortable adjusting the registry on Windows target
servers, you can obtain better Dominion KX II mouse synchronization at login screens by using
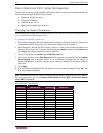
the Windows registry editor to change the following settings (HKEY_CURRENT_USER\Control
Panel\Mouse): MouseSpeed = 0; MouseThreshold 1= 0; MouseThreshold 2 = 0.
Windows 2000 Settings
To configure target servers running Microsoft Windows 2000:
1. Configure the mouse settings:
a. Select Start > Control Panel > Mouse.
b. Open the Motion tab.
- Set the acceleration to None.
- Set the mouse motion speed setting exactly to the middle speed.
- Click OK.
2. Disable transition effects:
a. Select the Display option from Control Panel.
b. Open the Effects tab.
c. Clear the Use the following transition effect for menus and tooltips option.
d. Click OK.
e. Close the Control Panel.
Windows Vista
To configure target servers running Microsoft Windows Vista:
1. Configure the mouse settings:
a. Select Start > Settings > Control Panel > Mouse.
b. Open the Pointer Options tab. In the Motion group:
- Set the mouse motion speed setting exactly to the middle speed.
- Disable the Enhanced pointer precision option.
- Click OK.
2. Disable animation and fade effects:
a. Select the System option from Control Panel.
b. Select
Advanced system settings. The System Properties dialog opens.
c. Open the Advanced tab.
d. Click the Settings button in the Performance group. The Performance Options dialog
opens.
e. Under Custom options, clear the following checkboxes: