


CHAPTER 3: INSTALLATION AND CONFIGURATION 19
Assigning an IP Address
These procedures describe how to assign an IP Address using the Network Settings page. For
complete information about all of the fields and the operation of this page, refer to
Network
Settings.
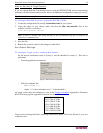
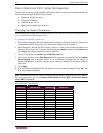
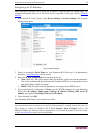
1. From the KX II Local Console, select Device Settings > Network Settings. The Network
Settings page opens.
Figure 8: Network Settings
2. Specify a meaningful Device Name for your Dominion KX II unit; up to 16 alphanumeric
characters,
special characters, and no spaces.
3. Select the IP auto configuration from the drop-down list:
• None (Static IP). This option requires that you manually specify the network parameters.
This is the recommended option because the Dominion KX II is an infrastructure device
and its IP Address should not change.
• DHCP. With this option, network parameters are assigned by the DHCP server.
4. If you specify an IP configuration of None, type the TCP/IP parameters for your Dominion
KX II unit: IP address, Subnet mask, Gateway IP address, Primary DNS server IP
address, and (optional) Secondary DNS server IP address.
5. When finished, click OK.
Your Dominion KX II unit is now network accessible.
Note: In some environments, the LAN Interface Speed & Duplex setting default of Autodetect
(auto-negotiation) does not properly set the network parameters, resulting in network issues. In
these instances, setting the Dominion KX II LAN Interface Speed & Duplex field to 100
Mbps/Full Duplex (or whatever option is appropriate to your network) addresses the issue. Refer
to the
Network Settings page for more information.