


Chapter 2: Installation and Configuration
29
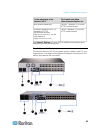
2. Once the unit has booted, the Dominion KX II Local Console is
visible on the monitor attached to the Dominion KX II local port. Type
the default username (admin) and password (raritan) and click Login.
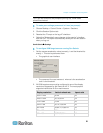
The Change Password screen is displayed.
3. Type your old password (raritan) in the Old Password field.
4. Type a new password in the New Password field and retype the new
password in the Confirm New Password field. Passwords can be up
to 64 characters in length and can consist of English, alphanumeric
characters as well as special characters.
5. Click Apply.
6. You will receive confirmation that the password was successfully
changed. Click OK. The Port Access page is displayed.
Note: The default password can also be changed from the Raritan
Multi-Platform Client (MPC).
Assigning an IP Address
These procedures describe how to assign an IP address on the Network
Settings page. For complete information about all of the fields and the
operation of this page, see Network Settings (on page 120).
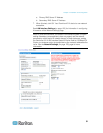
1.
Cho
ose Device Settings > Network. The Network Settings page
opens.
2. Specify a meaningful Device Name for your Dominion KX II device.
Up to 32 alphanumeric characters using valid special characters and
no spaces.
3. In the IPv4 section, enter or select the appropriate IPv4-specific
network settings:
a. Enter the IP Address if needed. The default IP address is
192.168.0.192.
b. Enter the Subnet Mask. The default subnet mask is
255.255.255.0.
c. Enter the Default Gateway if None is selected from the IP Auto
Configuration drop-down.
d. Enter the Preferred DHCP Host Name if DHCP is selected from
the IP Auto Configuration drop-down.
e. Select the IP Auto Configuration. The following options are
available:
None (Static IP) - This option requires that you manually specify
the network parameters.
This is the recommended option because the Dominion KX II is
an infrastructure device and its IP address should not change.