


IPv6 configuration
190
2. Using a Network-Connected Machine
DHCPv6 address configuration
If you have a DHCPv6 server on your network, you can set one of the following
options for default dynamic host configuration.
• Accessing menus may differ from model to model (see "Accessing the
menu" on page 33).
• It may be necessary to press OK to navigate to lower-level menus for
some models.
1
Select (Menu) > Network > TCP/IP (IPv6) > DHCPv6 Config on the
control panel.
Or select Setup> Machine Setup > Next > Network Setup > TCP/IP
(IPv6) > DHCPv6 Config on the touch screen.
2
Press OK to select the required value you want.
• DHCPv6 address: Always use DHCPv6 regardless of router request.
• DHCPv6 Off: Never use DHCPv6 regardless of router request.
• Router: Use DHCPv6 only when requested by a router.
11
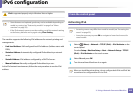
From the SyncThru™ Web Service
Activating IPv6
1
Access a web browser, such as Internet Explorer, from Windows. Enter
the machine IP address (http://xxx.xxx.xxx.xxx) in the address field and
press the Enter key or click Go.
2
If it’s your first time logging into SyncThru™ Web Service you need to
log-in as an administrator. Type in the below default ID and password.
We recommend you to change the default password for security
reasons.
• ID: admin
• Password: sec00000
3
When the SyncThru™ Web Service window opens, move the mouse
cursor over the Settings of the top menu bar and then click Network
Settings.
4
Click TCP/IPv6 on the left pane of the website.
5
Check the IPv6 Protocol check box to activate IPv6.
6
Click the Apply button.
7
Turn the machine off and turn it on again.