


Fax features
297
4. Special Features
3
Press OK.
37
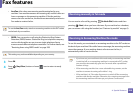
Receiving a fax in the computer
• This feature may not be available depending on model or optional goods
(see "Features by models" on page 5).
• To use this feature, set the option on the control panel:
Press (fax) > (Menu) > Fax Feature > Receive Forward >
Forward to PC > Forward the control panel.
Or select Setup > Machine Setup > Next > Fax Setup > Receive
Forward > Forward to PC > Forward on the touch screen.
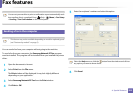
1
Open the Samsung Easy Printer Manager.
2
Select the appropriate machine from the Printer List.
3
Select Fax to PC Settings menu.
4
Use Enable Fax Receiving from Device to change the fax settings.
• Image Type: Convert the received faxes to PDF or TIFF.
• Save Location: Select location to save the converted faxes.
• Prefix: Select prefix.
• Print received fax: After receiving the fax, set prints information for
the received fax.
• Notify me when complete: Set to show the popup window to
notify receiving a fax.
• Open with default application: After receiving the fax, open it with
default application.
• None: After receiving a fax, the machine does not notify the user or
opens the application.
5
Press Save > OK.
38
Changing the receive modes
1
Press (fax) > (Menu) > Fax Setup > Receiving > Receive Mode
on the control panel.
Or select Setup > Machine Setup > Next > Default Setting > Fax
Default > Common > Receive Mode on the touch screen.
2
Select the option you want.
• Fax: Answers an incoming fax call and immediately goes into the fax
reception mode.
• Tel: Receives a fax by pressing (On Hook Dial) and then
(Start) button.