


18
To enable KVM security
1 Display the KVM conguration menu.
2 Use to highlight ‘Setup Options’ and press .
3 Highlight ‘Security’ and press to select ‘ENABLED’.
4 Now create a new password for the ADMIN user account.
To set an ADMIN password
1 Display the KVM conguration menu.
2 Use to highlight ‘Edit User List’ and press .
3 Highlight ‘ADMIN’ and press . Press again to accept the name
‘ADMIN’ without change.
4 Enter an appropriate password for the ADMIN user account with regard to
the following:
• The password can be up to 12 characters long.
• The password can use letters, numerals and/or certain punctuation
marks.
• The password is not case sensitive.
5 Press . The ‘Edit Access Rights’ menu will be displayed. However, as the
ADMIN account always has access to all computers, press again to save
the new password.
What to do if the ADMIN password has been forgotten.
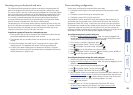
To change the KVM hotkeys
1 Display the KVM conguration menu.
2 Use to highlight ‘Setup Options’ and press .
3 Highlight ‘Hotkeys’ and press to select the required hotkey
combination. The options are: CRTL+ALT, CTRL+SHIFT, ALT+SHIFT, ALT
GR, LEFT ALT+RIGHT ALT, LEFT CTRL+LEFT ALT, RIGHT CTRL+RIGHT ALT or
DISABLED.
4 Press to return to the ‘Conguration Menu’.
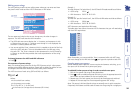
To create/edit KVM user accounts
1 Display the KVM conguration menu. Note: You must be logged-in as the
ADMIN user.
2 Use to highlight ‘Edit User List’ and press .
3 Either:
• Create a new account - Press , enter a new user name and press ,
or
• Edit an existing account - Highlight the required user name and press
Edit the name, if appropriate, and/or press .
4 Enter or edit the password with regard to the following:
• The password can be up to 12 characters long.
• The password can use letters, numerals and/or certain punctuation
marks.
• The password is not case sensitive.
• The password eld can remain blank to allow open access to this
account.
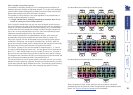
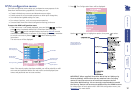
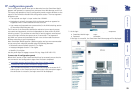
5 Press to display the ‘Edit Access Rights’ menu. Here you can determine
which of the connected computers can be accessed by the selected user
account. Only computers that show the ‘+’ marker to the right of the menu
box will be accessible to the user account.
Note: Access rights for user accounts to particular computers can also be
controlled from the ‘Edit Computer List’ menu.
6 Select and deselect computers as follows:
• Individual computer - Use and to highlight a computer name,
then press to apply, or remove, a ‘+’ marker.
• Access to all computers – Press
• Access to no computers – Press
7 When all settings have been made, press to save and exit. Press to
return to the ‘Conguration Menu’.