


Enhanced Routing Capabilities
Avaya X330WAN User’s Guide 35
Enhanced Routing Capabilities
This section describes the following X330WAN routing features:
• Static Route Configuration
• Export Default Metric
• OSPF Dynamic Cost Support
• RIP Distribution Access Lists
• Fragmentation and Reassembly
The following configuration examples integrating the above concepts are provided:
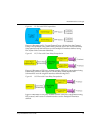
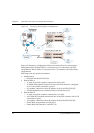
• Configuring X330WAN to Connect Branch Offices to Headquarters
• Configuring the X330WAN for use with an External Firewall
Static Route Configuration
Static routes can be configured to the X330WAN. They are never timed-out, and can
only be removed by manual configuration. Deletion (by configuration) of the IP
interface deletes the static routes using this interface as well.
A static route becomes inactive whenever the underlying Layer 2 interface is down,
except for Permanent Static Routes, described on page 36. When the underlying
Layer 2 interface becomes active, the static route re-enters the routing table again.
Static routes can be configured as next using the following:
• “via interface” route - via local serial interface, as described on page 36.
• Next-hop IP address - Destinations that are reachable via another router as a
next hop. The next hop router must belong to one of the directly attached
networks for which X330WAN has an IP interface.
Two kinds of static routes can be configured, High Preference static routes which are
preferred to routes learned from any routing protocol and Low Preference static
routes which are used temporarily until the route is learned from a routing protocol.
By default, a static route has Low Preference.
Static routes can be advertised by routing protocols (i.e. RIP, OSPF) as described
under Route redistribution.
Static routes also support load-balancing similar to OSPF. You can configure up to
three next-hops for each static route in one of the following manners:
• Enter all of the next-hops using a single
ip route command. To add a new
next-hop to an existing static route, enter the new next-hop individually, as in
the following option.
• Enter each next-hop individually with it’s own
ip route command.
Note: Using the no ip route command deletes the route including all of its
next-hops, whether entered individually or with a single command.