


2-16
Cisco 10008 Router Hardware Installation Guide
OL-0659-13
Chapter 2 Preparing for Installation
Required Tools and Equipment
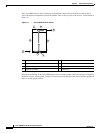
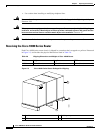
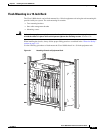
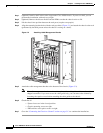
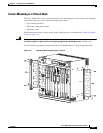
Step 2 With the other hand, grasp the top rear of the chassis under the air exhaust and carefully lift the chassis
as shown in Figure 2-4.
Required Tools and Equipment
The tools and equipment listed below are recommended as the minimum necessary to install the
Cisco 10008 router. You may need additional tools and equipment to install associated equipment and
cables. You may also require test equipment to check electronic and optical signal levels, power levels,
and communications links.
• Number 2 Phillips screwdriver
• A 3/16-inch flat-blade screwdriver
• A 1/4-inch flat-blade screw driver
• Antistatic mat or antistatic foam
• An electrostatic discharge (ESD) grounding strap or the disposable ESD strap shipped with the
system
• Tape measure (optional)
• Level (optional)
Refer to the “Connecting the Chassis to Ground” section on page 3-13 for specific tool and equipment
requirements to connect the chassis to ground.
Verifying Contents After Unpacking
Power cables, manuals, and other additional items are packaged in separate boxes. After you have
unpacked the system to verify that you have received all of the required components. Using the packing
list as a guide, take the following steps to check the contents of the Cisco 10008 router shipping
container:
Step 1 Check the contents of the boxes containing accessory items. Verify that you have received all equipment
listed in your order, including the following:
• System hardware and software documentation
• Any optional equipment that you ordered, such as transceivers (GBICs), flash cards, cables, or
special connectors
Step 2 Check that all line cards you ordered are installed in the chassis (including PCMCIA flash cards installed
in the PRE). Ensure that the configuration matches the packing list.