


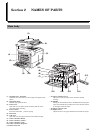


Section 2 NAMES OF PARTS
2-6
NOTE
Keys related to operational procedures which appear on
the touch panel with their name displayed are indicated
in this Operation Guide within double quotation marks.
(Ex.: Press the “xxx” key.)
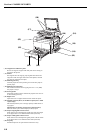
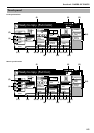
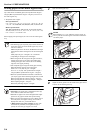
(1) This area displays messages on the machine’s status
and on operational procedures.
(2) This area displays information on the size of paper in
the drawer[cassette] and the current copy
magnification ratio.
(3) This area displays the current number of copies to be
made.
(4) Paper size keys (Remaining paper volume icons)
Press these keys when you want to change the currently
selected drawer[cassette] in order to change the size of paper
that will be used. The drawer[cassette] that holds the
currently selected paper size and type of paper will be
highlighted.
Drawer[Cassette] No. 1 will not be displayed on duplex
copiers. Drawer[Cassette] No. 2, Drawer[Cassette] No. 3, and
Drawer[Cassette] No. 4 will be displayed when the optional
Paper Feeder is installed on your copier.
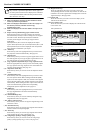
(5) “APS” key
Press this key until it is highlighted when you want to have
the paper size selected automatically. (See page 4-2.)
(6) “Bypass” key
Press this key when you want to copy onto paper that is set on
the multi-bypass tray. The type of paper registered for use on
the multi-bypass tray will be indicated in the key.
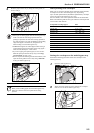
(7) Copy exposure adjustment keys / Copy exposure scale
Press the appropriate key when you want to manually adjust
the copy exposure. The copy exposure scale will indicate the
currently selected setting. (See page 4-3.)
(8) “Exposure mode” key
Press this key when you want to access the “Exposure mode”
screen.
(9) “Auto Exposure” key
Press this key until it is highlighted when you want to select
the auto exposure mode. When making monochrome [B/W]
copies in the auto exposure mode, the contrast of the original
will be detected and the most suitable exposure level selected
automatically. When making full color copies in this mode, the
copier will automatically perform the corresponding
background exposure adjustment. (See page 4-3.)
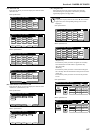
(10) “AMS” key
Press this key until it is highlighted when you want to have
the copy magnification ratio selected automatically.
(See page 6-1.)
(11) “Reduce/Enlarge” key
Press this key when you want to manually change the copy
magnification ratio. (See page 6-2.)
(12) “100%” (same size) key
Press this key when you want to copy the original image at its
actual size “100%”.
(13) “Text+Photo” key
Press this key when you want to copy originals that contain a
mixture of both text and photographs.
(14) “Text” key
Press this key when you want to copy originals that contain
large amounts of text, such as documents, etc.
(15) “Orig.image quality” [“Image quality”] key
Press this key when you want to access the “Orig.image
quality” [“Image quality orig.”] screen. (See page 4-4.)
(16) Registration keys
Press the appropriate key when you want to access the
corresponding function or mode. Any function or mode in the
“Function” tab can be registered to be displayed as one of the
registration keys. (See page 6-64.)
(17) “Basic” tab
Press this tab when you want to return the display to the
contents of the “Basic” tab.
(18) “User choice” tab
Press this tab when you want to display the contents of the
“User choice” tab.
Inch specifications
Metric specifications
Ready to copy. (Full-Color)
Paper Size
Set
Basic User choice Function Color func. Program
11x8
1
/
2
"
Sort/
Finished
2 sided/
Separation
Combine
Select
orig.size
Margin/
Centering
Border
Erase
Set
Ready to copy. (Full Col.)
Paper Size
Basic User choice Function Colour func.
Program
Sort/
Finished
2-sided/
Split
Merge copy
Select
size orig.
Margin/
Imag.shift
Erase
Mode