


Configuring input trays
The printer allows you to configure input trays by type and size. You can load different media
in the printer’s input trays and then request media by type or size using the control panel.
NOTE
If you have used other HP LaserJet printer models, you might be accustomed to configuring
Tray 1 to first mode or cassette mode. On theHP Color LaserJet 4610n printer, setting Tray
1 size and type to ANY SIZE is equivalent to first mode. Setting size or type for Tray 1 to a
setting other than ANY SIZE is equivalent to cassette mode.
NOTE
The instructions below are to configure the trays at the printer control panel.
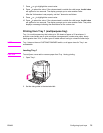
Configuring trays when the printer gives a prompt
In the following situations, the printer automatically prompts you to configure the tray for type
and size:
● when you load paper into the tray
● when you specify a particular tray or media type for a print job through the printer driver
or a software application and the tray is not configured to match the print job’s settings
The control panel displays this message: LOAD TRAY XX: [TYPE] [SIZE], To change type
press
. The instructions below explain how to configure the tray after the prompt appears.
NOTE
The prompt does not appear if you are printing from Tray 1 and if Tray 1 is configured for
ANY SIZE and ANY TYPE.
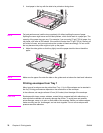
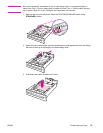
To configure a tray when loading paper
1. Load paper in the tray. (Close the tray if you are using Tray 2.)
2. The printer displays the tray configuration message TRAY X To change size or type
press
.
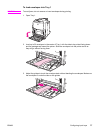
3. Press
to display the TRAY X SIZE= menu.
4. To change the size, press
or to highlight the correct size.
5. Press
to select the size.
Depending on the size setting, the printer might prompt you to move the CUSTOM/
STANDARD switch in Tray 2 to the other position. Follow the instructions in the prompt,
and then close the tray.
A Setting saved message appears, and then a prompt appears to configure the paper
type.
6. To change the type, press
or to highlight the correct paper type.
7. Press
to select the paper type.
A Setting saved message appears, and then the current type and size settings are
displayed.
8. If size and type are now correct, press
to clear the message.
72 Chapter 4 Printing tasks ENWW