


Chapter 5 117
Changing Your Computer Hardware Configuration
Removable Media Devices
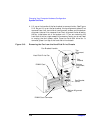
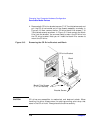
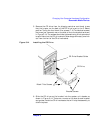
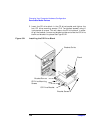
5. Remove the CD drive from its shipping container and check to see
that the jumper on the back of the CD drive is set to the C Select
position. Using the four blank filler screws (T-10 Torx/slotted screws)
that were just removed, mount the disk drive to the bracket as shown
in Figure 5-14. The screws should be tightened using 6 inch-pounds of
torque. Note that the CD drive should extend approximately one inch
out from the front of the CD drive bracket.
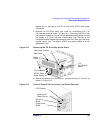
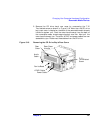
Figure 5-14 Installing the CD Drive
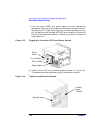
6. Slide the CD drive and its bracket into the system unit chassis as
shown in Figure 5-14. There are runners on the side of each bracket
and guides inside the CD drive chassis that will help the assembly to
slide into place.
Blank Filler Screws
Bracket Screws
CD Drive Bracket Guide
CD Drive