


Chapter 6 189
The Boot Console Interface
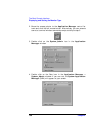
Displaying and Setting the Monitor Type
Once you have made your monitor type selection, the system queries you
to confirm your selection. Press Y to save this monitor type.
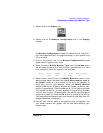
If you press any key other than Y, the following message is displayed:
Monitor type not saved.
At this point, the new monitor type is active, but not saved. Because you
did not save the monitor type, the next time you reboot the system the
original monitor type will be used.
Next, the following message is displayed:
To select a new Graphics Monitor Type press the <TAB> key now, otherwise EXIT by
entering any other key (or will time out in 15 seconds)...
To restart the monitor selection process, press Tab.
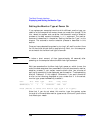
Troubleshooting Monitor Problems
In the event that your console stops displaying to your graphics device,
use the following procedure to set the console for displaying to an
external terminal.
Here are the steps to follow:
1. Turn system power off.
2. Disconnect the computer keyboard connector from the system rear
panel.
3. Connect a serial terminal emulator to the Serial 1 connector (the left
serial connector) on the system rear panel. Configure the terminal
for: 9600 baud, No Stop Bits, No Parity, 8 Bits.
4. Power on the system. The system will now display the console to the
terminal connected to Serial 1 port. Note that you can use a 9-pin to
9-pin serial cable (HP F1044-80002) to connect an HP OmniBook
serial port to the workstation.
5. Set the monitor type and path using the Boot Console Interface. For
information on doing this see the section “Setting the Monitor Type
with SAM.”