


188 Chapter6
The Boot Console Interface
Displaying and Setting the Monitor Type
Setting the Monitor Type at Power On
If you replace your computer’s monitor with a different monitor type, you
need to let the computer’s firmware know you made this change. To do
this, reboot the system and use either the automatic monitor selection
process or the boot console interface’s monitor command. The monitor
command is described in the section “Setting the Monitor Type” in this
chapter. The automatic monitor selection process is described in this
section.
Once you have rebooted the system by turning it off, wait for a short time
for the hard disk drive’s disk to stop spinning. Next, turn the computer
on and watch for the Num Lock light to come on.
NOTE It takes a short amount of time (approximately 40 seconds) after
powering on the computer before the Num Lock light comes on.
Wait two seconds after the Num Lock light comes on, which is near the
end of the boot sequence, then press Tab to initiate the automatic monitor
selection process. If your screen remains blank after two minutes of
waiting for something to be displayed, see the section “Troubleshooting
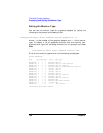
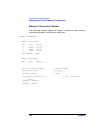
Monitor Problems” in this chapter. Otherwise, if you see information
similar to the following displayed on your screen and it is the correct
monitor type, press the Enter key to select it.
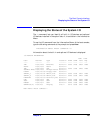
Path Slot Head Type Size Freq Class
---------- ---- ---- ---- ------------ ---- -----
GRAPHICS(2) 2 1 n
nnnn
x
nnnn nn
Hz PCI
Press [Return] to select this monitor type (type
n
of
n
types).
Note that if you do not select this monitor type, the system cycles
through all of the available monitor types one at a time until you find one
that meets your needs.