


Conductivity/Resistivity Analyzer/Controller
9782 Series Conductivity/Resistivity Analyzer/Controller - Operator’s Manual 7/998-4
8.3 Entering the Cal Factor for Each Cell
Introduction
Each type of cell has an associated cell constant; this number is part of the cell model number.
The constant for each cell is entered during I/O setup. However, for greater precision, every
Honeywell cell is individually tested at the factory, and a calibration factor unique to that cell is
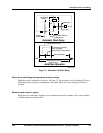
determined. The cal factor for a cell can be found on the plastic tag hanging from the cell lead
wires.
ATTENTION
Any time you replace a cell, even with another cell of the same type, enter the cal factor for the
replacement cell.
Procedure
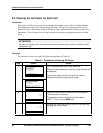
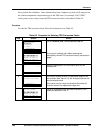
To enter the cal factor for each cell, follow the procedure in Table 8-1.
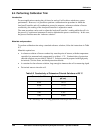
Table 8-1 Procedure for Entering Cal Factor
Step Screen Action
1
MENU
CONFIGURATION
CALIBRATION
MAINTENANCE
I/O SETUP
DIAGNOSTICS
| |
Go to CALIBRATION | CELL CAL FACTOR.
The cell constant entered for each cell during I/O setup will
be displayed.
To enter the unique cal factor for each cell, use the
indicated function key to go into edit mode.
CALIBRATION
CELL CAL FACTOR
CAL TRIM 1
CAL TRIM 2
REMOVE CAL TRIM C1
REMOVE CAL TRIM C2
DIAGNOSTICS
| |
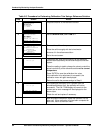
2
CELL CONSTANTS
C1 10.0
C2 10.0
DIAGNOSTICS
| | NEXT
The current cell constant for each cell will be displayed.
This information is read-only.
To change the values, use the function key labeled
“NEXT”. To exit, use the MENU key.
3
EDIT CELL CAL FACTOR
C1 10.101
C2 09.955
DIAGNOSTICS
DPP | <-- | -->
For each cell, enter the cal factor found on the plastic tag
hanging from the cell leads.