


86 Océ TDS800 User Manual
Define file names
You can define the file names in the following two methods.
1 automatic file number definition for all originals in the scan-to-file job
2 manual file name definition per original in the scan-to-file job.
▼ Automatic file number definition
1
Select a destination.
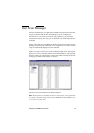
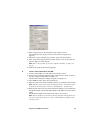
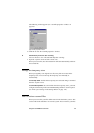
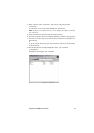
2 Open the ‘File’ menu and select ‘Properties’.
The ‘Destination properties’ screen appears (see Figure 32 on page 83).
3 Enter a name in the ‘Base name’ text box.
Do not change the ‘###’ part, this part is used for automatic file name
numbering. Océ Scan Logic replaces ‘###’ by an ascending number. You can
put dots in the ‘Base name’.
4 Select or clear the check box ‘Add correct file extension’ to add or leave out
the file extension. Set the file extension in the Océ Settings Editor.
5 Enter the start value for the automatic file naming in the ‘Start value for ###’
field.
6 Click ‘OK’ to accept the destination properties.
7 Scan the originals.
You can scan now with automatic file name numbering. Select the above
destination on the scanner operator panel and set all scan-to-file properties.
While you scan, the scanner operator panel displays the file name. The settings
are active until a copy job interrupts the scan job.
▼ Manual file name definition
1
Select a destination.
2 Open the ‘File’ menu and select ‘Properties’.
The ‘Destination properties’ screen appears (see Figure 32 on page 83).
3 Select or clear the check box ‘Add correct file extension’ to add or leave out
the file extension. Set the file extension in the Océ Settings Editor.
4 Enter a name in the ‘Base name’ text box.
Remove the ‘###’ part, this part is used for automatic file naming. You can put
dots in the ‘Base name’.
5 Click ‘Apply’ to accept the destination properties.
The ‘Destination properties’ screen stays open and is ready for the next
scan-to-file action after the current original is scanned.
6 Scan the original.
7 Repeat step 4, 5 and 6 for each original.