


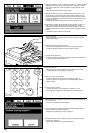

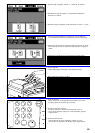


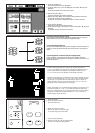
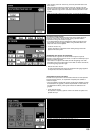

1. Touch the "Added" key.
The function selection screen will appear.
2. Touch the "Stitching" key. If the "Stitching" key is not displayed, touch the
"▼" key or the "▲" key to display it.
The stitching mode setting screen will appear.
1. Effleurer la touche "Ajout".
L'écran de sélection des fonctions apparaît alors.
2. Effleurer la touche "Reliure". Si la touche "Reliure" n'apparaît pas,
effleurer la touche "▼" ou la touche "▲" pour la faire apparaître.
L'écran de réglage du mode de reliure brochure apparaît alors.
1. Toque la tecla "Añadido".
Aparecerá la pantalla de selección de función.
2. Toque la tecla "Cosiendo". Si no aparece la tecla "Cosiendo", toque la
tecla "▼" o la tecla "▲" para visualizarla.
Aparecerá la pantalla de ajuste del modo de cosido.
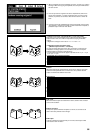
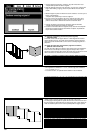
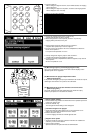
3. Select the type of cover. "Copy: F/R", "Copy: Front" or "Copy: F/Blank: R"
can be selected.
3. Sélectionner le type de couverture. Il est possible de sélectionner "Copie:
R/V", "Copie: Recto" ou "Copie: R/Vierge: V".
3. Seleccione el tipo de cubierta. "Copia:-F/A", "Copia: frente" o "Copia:
F/Revés: R" pueden seleccionarse.
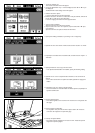
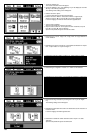
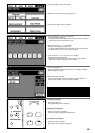
4. Select the type of originals. "2 sided" or "1-sided" can be selected.
4. Sélectionner le type d'original. Il est possible de sélectionner "Rect/verso"
ou "Recto".
4. Seleccione el tipo de originales. Puede seleccionar "2 Lados" o "1 Lado".
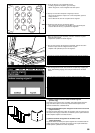
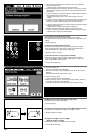
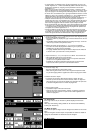
5. Select the binding orientation by touching the "Left" key or the "Right"
key.
The finishing setting screen will appear.
5. Sélectionner l'orientation de la reliure en effleurant la touche "Gauche" ou
la touche "Droit".
L'écran de réglage de finition apparaît alors.
5. Seleccione el sentido de cosido tocando la tecla "Izquier." o la tecla
"Derecha".
Aparecerá la pantalla de ajuste de terminación.
93