Scanning documents or images for e-mailing
When you want to scan a new item and send it through e-mail:
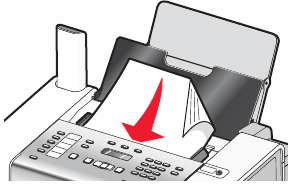
1 Load an original document facedown into the Automatic Document Feeder (ADF).
2 From the Finder desktop, double-click the Lexmark 5000 Series folder.
3 Double-click the Lexmark 5000 Series Center icon.
4 From the “What is being scanned?” menu, select a document type.
5 From the “How will the scanned image be used?” menu, choose To be viewed on monitor/web page.
6 From the “Send scanned image to” menu, choose an application.
7 Click Scan.
8 Retrieve the scanned image from the application, and send it through e-mail as an attachment.
Related topics:
• “Loading original documents into the Automatic Document Feeder (ADF)” on page 19
Scanning multiple pages using the Automatic Document Feeder
1 Load original documents facedown into the Automatic Document Feeder (ADF).
2 From the Finder desktop, double-click the Lexmark 5000 Series folder.
3 Double-click the Lexmark 5000 Series Center icon.
4 Select Prompt for multiple pages. This option automatically scans all documents loaded into the ADF and
creates a numbered file name according to the one you specified.
Notes:
• To save each scanned item under a different file name, select Prompt to name each page.
• When a scan job is saved as a PDF, the Save dialog will prompt once and all scanned pages are saved in
a single file.
5 Click Scan.
6 In the Save dialog, enter a file name for your scan job.
7 From the Where pop-up menu, choose a destination for the scanned items.
8 From the “Format for” pop-up menu, choose a file type.
9 Click OK.
Related topics:
• “Loading original documents into the Automatic Document Feeder (ADF)” on page 19
Working with photos
84


