


1.2
Getting started
9
AC
power switch — Turns your fax machine on and off.
10
AC
power jack — Where you plug in the
AC
power cord.
11
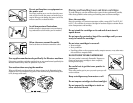
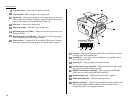
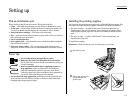
Bypass tray — Open the bypass tray to use the paper that is not set in the
paper cassette. It can hold up to 50 sheets of paper. For details about paper
capacity of the bypass tray, see “Specifications,” page
AI
.2.
12
Side cover — Open to fix a printout jam.
13
Side cover release — Pull this to open the side cover.
14
Recording paper size sticker — Shows the size of the paper that is set in
the paper cassette.
15
Recording paper level indicator — Shows the level of the paper supply
without requiring you to open the paper cassette.
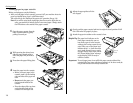
16
Paper cassette — Set paper here. It can hold up to 500 sheets. For details
about paper capacity of the paper cassette, see “Specifications,” page
AI
.2.
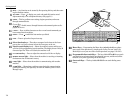
17
LINE
jack — Where you plug in the telephone line cord. The other end of the
cord plugs into a wall telephone jack.
18
PHONE
2 jack — If you connect a second telephone to your machine, this is
where you plug in the cord.
19
PHONE
1 jack — Where you plug in the optional handset.
20
PRINTER PARALLEL
port (optional) — Where you plug in the printer cable,
when you use the optional printer controller.
21
RS-232C interface port (optional) — Where you plug in the RS-232C
cable, when you use the optional RS-232C interface kit.
22
Extension paper tray — Holds up the printout after it emerges.
23
Printed document exit — Where the printout emerges.
24
Handset (optional ) — Used for voice communication. This handset is avail-
able from your authorized Muratec dealer, and can be added when you
purchase the F-360 or as an upgrade afterward.
LINE
PHONE1PHONE2