


40 Pelco Manual C690M-E (11/04)
Look at each camera in the quality setting you have chosen to ensure it is appropriate
for the intended use. Quality settings that are too low might not accomplish your goal
while settings higher than necessary will increase the amount of hard drive space
needed.
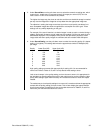
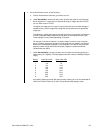
The easiest way to check quality settings is to connect in live mode and view the
appropriate camera with the quality setting you have chosen. This will also display the
approximate file size for those images. Compare the file size to the table under step
4c. and to Tables A, B, and D to make sure your hard disk calculations are correct.
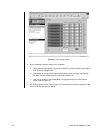
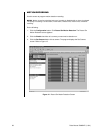
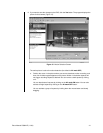
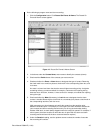
d. Under Cam. Command, if desired use the pull-down menu to select None, Go
Preset (send the camera to the presets), or Run Pattern (activate a pattern). You set
patterns and presets in live video.
NOTE:
Running a pattern or preset will itself cause motion.
e. Under Value, if desired use the pull-down menu to select the number of the preset or
pattern to run.
f. Click the Save button. The program returns you to the Record On Motion Detection
screen.
5. Use the Duration up/down arrows to set the number of seconds to record following an
event.
6. Use the Priority pull-down menu to pick either event or alarm as the recording priority.
Events will interleave (intersperse) pictures by reducing the image rate (if necessary) from
lower priority recordings, such as scheduled recording. Alarms take absolute priority over
all other recording types.
7. Click the Configuration button for a selected camera.