


Pelco Manual C690M-E (11/04) 71
WARNING:
Changing disk allocations will erase all hard drive data.
To allocate hard drive space, do the following:
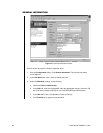
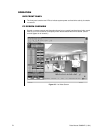
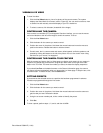
1. Click the Configuration button. Click Disk Allocation. The Disk Allocation screen
appears.
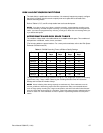
2. At the bottom of the screen are three tabs: Motion Event Estimation, Contact Event
Estimation, and Data Event Estimation.
In the boxes under the Events/Week heading, you should estimate how many events
each of the 16 or 8 (depending on model) contacts/motions/data will be experienced in a
week. You must do this in order to get accurate recording estimates in the following field.
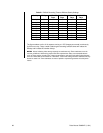
3. Use the up/down arrows under the Size % heading to enter what percentage of the disk
space you want allocated to the different recording modes (scheduled, motion, event, and
alarm). Or click the Max button for the mode.
The screen displays for each mode an estimate of how many days until the oldest
information is overwritten. The color grid is a graphic representation of these percentages:
green is scheduled recording, blue is motion recording, yellow is event recording, and red
is alarm recording.
4. Click the Fill Ratio button to evenly distribute the remaining disk space to the four
sections.
5. Click Save to save the values or Cancel to abandon.