


46 Pelco Manual C690M-E (11/04)
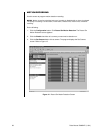
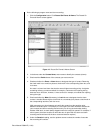
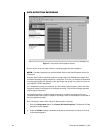
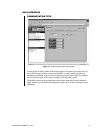
7. Click Set Camera to select the camera that will record the contact and to set camera
values for the recording. The program displays the Set Camera screen. Refer to Figure 13.
Having a selection of multiple cameras can be important during alarm recording. For
example, during a bank robbery, cashier 2 triggers the robbery button. You want to record
high-quality images from the camera that only covers cashier 2, but also want images
from the general surveillance camera that covers the entire inside of the bank as well as
exit cameras on the front and back doors. For this example you could program the system
for 4 images per second (IPS) for the cashier 2 camera and 2 IPS each for the other
three.
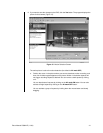
8. On the Set Camera screen, do the following:
a. Click to checkmark the camera(s) you want to turn on.
b. Under Record Rate, use the pull-down menu to select the camera’s recording rate,
which ranges from 1 image every 64 seconds through 16 images per second (IPS).
You can have a total of 16 IPS for all cameras at any instant.
The higher the image rate, the closer to real time and the more hard disk storage is
needed per day. Use the Images/Sec Usage bar to help determine the appropriate
image rate.
The objective in setting the image record rate (as well as record quality; see step 8.c)
is to store acceptable images that show enough detail to accomplish the user’s goal.
These settings can vary widely depending on the goal.
For example, if the user’s intention is to obtain images in order to catch a criminal
during a robbery, high quality images at a high image rate are needed. If all the user
wants to do is differentiate employee 1 from employee 2 for internal loss prevention
purposes, slower image rates and lower quality images are sufficient and save
valuable hard disk space.
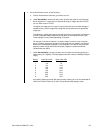
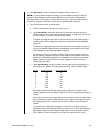
c. Under Record Quality, use the pull-down menu to select the recording quality (0 is
lowest setting, 8 is highest). This setting determines the number of kilobytes (KB) per
image.
Quality Lower Size (KB) Upper Limit (KB)
0 4.0 5.0
1 5.6 7.0
2 8.0 10.0
3 10.4 13.0
4 12.8 16.0
5 16.0 20.0
6 20.0 25.0
7 24.0 30.0
8 32.0 40.0
High quality settings consume disk space quickly. A setting of 2-6 (default is 8) is
recommended for normal use. Refer to Tables A, B, and D to help decide what setting
to enter.