


4-46 PC Setupbb __________________________________________
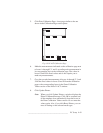
a. Note the amount Line B is over or under 388.61 mm.
b. Press the Menu key until LINE B appears. Then, press
the Enter key.
c. Press the Menu key until the amount which would most
closely adjust the line to the desired length appears.
Then, press the Enter key. For example, if Line B is 389
mm instead of 388.61 mm as it should be, select -0.50
mm to shorten the line to 388.50.
7. Press the Reset key to return to the previous menu level. Then,
press the Menu key until XACT:TEST PAGE reappears and
press the Enter key to print a new test page.
8. Repeat steps 5 and 6 until the line measurements agree with
the lengths listed on the test page.
9. Press the On Line key when the line lengths are correct.
READY/IDLE appears in the window.
Now the printer’s line lengths are calibrated correctly.
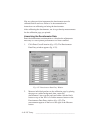
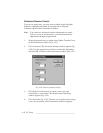
Command Center X-ACT
Use XANTÉ Command Center’s X-ACT feature to calibrate printer
line lengths and correct inaccuracies in printing width, height, skew,
and angle.
Note: You must have Command Center and your printer’s current
PPD installed before you can use Command Center’s X-
ACT. You also will need a 1/2 millimeter ruler.
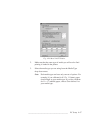
1. Open XANTÉ Command Center and select Controller: More
X-ACT. The More X-ACT window appears (fig. 4.28).