


6-20 Configurationbb ______________________________________
XANTÉ provides seven standard gamma correction curves and you
can create up to seven custom curves. Use the MISC:GAMMA
configuration menu or the Print dialog box Gamma menu to select
the desired curve.
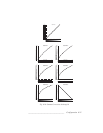
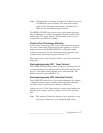
XANTÉ Gamma curves 1 through 5 progressively lighten midrange
grayscale values in an image. Gamma 0, the factory default, makes no
change to the image and Gamma 6 produces a reverse (negative) image
without changing the image in the application. The graphs in figure
6.12 show the changes to the midrange gray levels for Gamma
curves 0 through 6.
You may want to create and download up to seven custom gamma
curves to calibrate your printer for specific conditions. For example, to
set up a gamma curve for press output, use the following process:
1. Set the desired final output resolution on the printer’s front panel.
2. Print the calibration page to Myriad film on your printer.
3. Run the film output through the FilmStar 2 to increase the
transmissive density.
4. Burn the film image to Myriad plate.
5. Run the plate on the press.
6. Measure the output using a densitometer, linearize the data,
and create and save a new gamma curve.
Also, linearization can be used to the level of accuracy you need. For
example, you may want to linearize for the plate but do not feel you
need to compensate for dot gain on the press. In this case, in step 2 you
simply print the calibration page on a Myriad plate and then skip to step 6.
See “Calibration with a Densitometer (Gamma)” in chapter 3
(Macintosh) or 4 (PC) about creating custom gamma curves.