


_____________________________________ Macintosh Setup 3-37
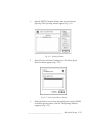
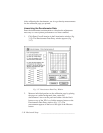
3. Make sure to enter the solid black (1) and solid white (2)
measurements first. Enter the number of the patch whose
densitometer measurement most closely matches (within ±
2%) the corresponding percentage in the Enter Coverage
Values section.
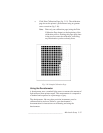
For example, when you are reading for 2%, if the box labeled 7
measures 2%, enter the number 7 in the corresponding box.
Note: The calibration page blocks are numbered from 0 to
255. You may have to check several blocks to find the
one that most closely matches the percentage in the
Densitometer Data Entry window.
Also, it is not necessary to measure for each coverage
value, but that is recommended to achieve more
accurate results.
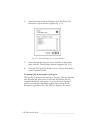
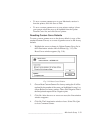
4. Click Graph to display a curve of your printer’s linear curve.
5. Click Linearize to continue. The Linearization window
reappears (3.15)
Note: If you need to stop linearization (for example, to
change the media type), you can click Cancel to stop.
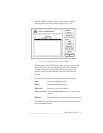
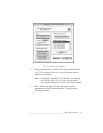
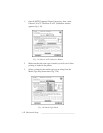
6. Click Save to Disk (fig. 3.15) if you want to save the data file
for future use. Then, specify a new file name and select a
folder for saving the file. Click Save. Otherwise, skip to step 7.
7. Click OK. The Linearization window closes.
Note: To verify linearization, click the Print Verification Page
button (3.16) before you close the Linearization window.
When this page prints compare it to the original calibration
page to verify the gamma correction; you should see an
improvement in gray scale progression.