


_____________________________________ Macintosh Setup 3-45
6. Make the measurements indicated on the calibration page next
to boxes A through F, I, and J, recording each measurement in
its corresponding box on the calibration page. The values in
boxes G and H are fixed values and do not require you to make
any measurements.
7. Compare the following pairs:
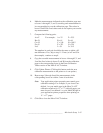
A to F For example: A = 25 F = 25.5
B to D B = 61 D = 61
C to H C = 190 H = 190.5
E to G E = 253 G = 254
I to J I = 39 J = 39.5
The numbers in each pair should be the same or within a 0.5
mm difference. If so, skip to step 11. If not (as in E and G in
the example), continue to step 8.
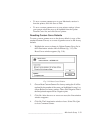
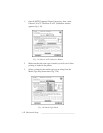
8. Copy the recorded measurements in boxes A through F, I, and
J and the fixed values in boxes G and H from the calibration
page to the corresponding boxes in the Enter Calibration
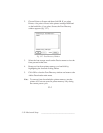
Values section of the More X-ACT window.
9. Click Update Printer. (Clicking this button sends the new
calibration measurements to the printer so it can update.)
10. Repeat steps 5 through 9 until the measurements in the
corresponding boxes are within .5 mm of each other.
Note: Your application printer properties must match your
calibration settings. For example, if you chose User-
defined 1 as your media type in the More X-ACT
calibration window for 11" x 17" (tabloid) paper, you
must choose User-defined 1 as your Media Weight in
your application printer properties when printing on
11" x 17" paper.
11. Click Ok to close the More X-ACT window.