


_______________________________________ Ethernet Setup 5-7
To configure the Novell server for NetWare versions 3.X or 4.X see
the next section; for version 5.X, skip to “Configure the Novell
Server (NetWare 5.X)” later in this chapter.
Configure the Novell Server (NetWare 3.X and 4.X)
This section covers setup for Novell NetWare Version 3.X and 4.X
using PConsole.
1. Check the AUTOEXEC.NCF file on the Novell file server
from the server console. If the following statement is not in the
file, add it using a text editor.
Set allow unencrypted passwords = on
2. Login to the network with supervisory privileges.
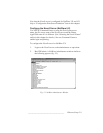
3. Type PCONSOLE and press Enter.
4. Set up the print server name using the following procedure. To
use a print server name other than the default, see the previous
section.
Note: The print server name on the printer must match the
corresponding print server name on the Novell file
server. For example use xante_ps for both of these
names. It also is recommended that you name the
Novell file server queue a similar name such as
xante_q.
a. Select Available Options: Print Server Information
(version 3.X) or Available Options: Print Servers
(version 4.X) and press Enter.
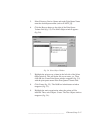
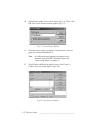
b. For version 4.X only, press the F4 key for bindery
emulation (XANTÉ does not support NDS [NetWare
Directory Services]).
c. Press Insert and type in your printer’s default PostScript
name adding _PS as an extension. This is the printer’s
default Novell print server name that appears on the
start-up page.