


Network Configuration
WorkCentre 7755/7765/7775 Multifunction Printer
System Administrator Guide
25
respond to this request with a router advertisement packet containing network-layer configuration
parameters.
Notes:
• IPv6 is optional and may be used in addition to or in place of IPv4. If both protocols are
disabled, you cannot access CentreWare IS.
• If your printer is locked, you must log in as a system administrator. For details, see
Accessing CentreWare IS on page 17.
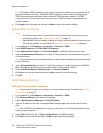
1. In CentreWare IS, click Properties > Connectivity > Protocols > IP (Internet Protocol).
2. Under Protocol, select Enabled. By default, IPv6 is disabled.
CAUTION: If both IPv4 and IPv6 are disabled, you cannot access CentreWare IS. You must re-
enable TCP/IP at the printer control panel before you can access CentreWare IS. Disabling TCP/IP
or changing the IP address also disables any dependant protocols.
Notes:
• The host name is the same for IPv4 and IPv6. If you change the host name for IPv6, the
host name changes for IPv4 as well.
• Enabling or Disabling IPv6 will restart the Network Controller when you click Apply.
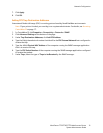
3. Type the required Domain Name.
4. Under Stateless Addresses, select Use Router Supplied Prefixes.
Notes:
• Router-supplied prefixes are 64-bit sub-network address that define how the printer can
perform auto-configuration. If routers are present, they will periodically send Router
Advertisement packets containing address prefixes.
• Routers will not forward packets with link-local addresses.
• Enabling Stateless Addresses allows the printer to automatically populate the Link-Local
Address. Link-Local addresses are network addresses that are used to communicate on
point-to-point links within one segment of a local network. They allow addressing hosts
without requiring a public address prefix.
Default DHCP Settings
By default, the printer performs auto-address DHCP configuration every time it starts up. This is used
for neighbor discovery and address resolution on the local IPv6 subnet.
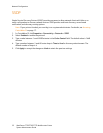
1. Select one of the following options:
• Use DHCP as directed by a router: This default option is fully automatic and allows the
printer to obtain and display the DHCPv6 Address on the screen.
• Always Enable DHCP for address assignment and other configuration data: This options is
fully automatic and allows the printer to obtain and display the DHCPv6 Address on the
screen along with additional configuration data.
• Never use DHCP: If you select this option, you must configure the Manual Address Options
and DNS separately.
• Always Enable DHCP for other configuration data only: This option only obtains other
configuration data.
2. If you want the printer to release its IP address when the it restarts, select Release DHCPv6
Address at Power Down.