


246 Appendix B– Restoring the Spire CX250 Color Server Software
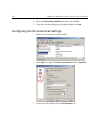
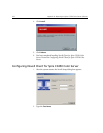
This operation will replace your current backup file
with a new one. Do you wish to continue?
Note: The system will reboot twice and remain offline
for several minutes during this process.
Click Yes to continue or No to cancel.
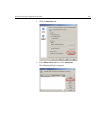
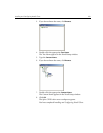
5. The Spire CX250 color server restarts and the Norton Ghost window
appears.
The files from partition C are copied to the Last Image file on
partition E. The process takes about five minutes to complete.
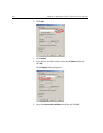
The server restarts and the Windows XP desktop appears.
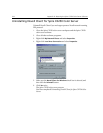
You have completed Backing Up the CX250 Last Image Configuration.
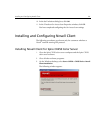
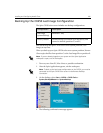
Performing a Test Print
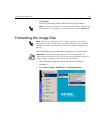
1. From the File menu select Import Job.
2. Locate the ATF_A3.ps file at:
D:\Sample_Files\Color Files\ATF Europe (A4_A3)\ATF_A3.ps,
or locate the ATF_tab.ps file at:
D:\Sample_Files\Color Files\ATF US (Letter_Tabloid)\ATF_Tab.ps.
3. Double-click the file to add it to the list for importing.
4. In the Published Printer list, select ProcessPrint.
Note: The appearance of the Windows XP desktop indicates a that
successful backup has been performed.
Tip: To copy the files to an external device, select Start > Run, type E:
and click OK. Copy only the files located on E:LI.GHO and E:LIxxx.GHO
(Last Image configurations) or E:FD.GHO and E:FDxxx.GHS (Factory
Default configurations).
Note: To import a file and perform a test print on the CX250, you must be
connected to the remote server via the Remote Desktop Connection. See
Working from the Remote Desktop Application on page 16.