


BIOS Setup Information 3-3
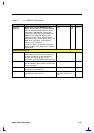
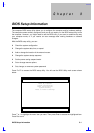
3.2 System Configuration
Selecting System Configuration presents a Basic System Configuration screen, where you can
change several items in your computer’s configuration.
Press ↑ or ↓ to move from one item to another, and ← or → to change settings. Press F1 to get
help on a selected item. Press Esc to exit the Basic System Configuration screen and return to the
main BIOS Utility screen.
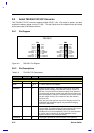
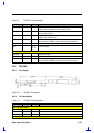
3.2.1 Date and Time
The current date is in “Day-of-the-week Month Day, Year” format—for example, [Mon Aug 11,
1997]. The current time is in “Hour:Minutes:Seconds” format. The system uses a 24-hour clock—
for example, 6:25:50 PM appears as 18:25:50.
3.2.2 Floppy Drives
The default setting for Floppy Drive A is 1.44 MB 3.5-inch. Floppy Drive B is set to None, and it is
only enabled if you connect an additional external floppy drive.
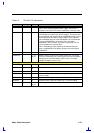
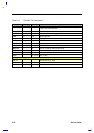
3.2.3 Hard Disks
The Hard Disk 0 entry refers to the computer’s internal hard disk. With this entry set to Auto, the
BIOS automatically detects the hard disk and displays its capacity, cylinders, heads, and sectors.
Other hard disk settings are configured automatically for optimum drive performance.
You can change the Hard Disk 0 entry to User if you want to enter drive settings manually. To
determine your drive settings, check the data found on your hard disk or supplied in the hard disk
vendor documentation.
Caution: We suggest that you leave this parameter set to
Auto to allow the BIOS to auto-detect the drive settings at
each boot-up.
The Hard Disk 1 entry is used when a CD-ROM drive module or second IDE drive option is
installed in the module bay.
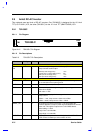
3.2.4 Num Lock After Boot
When set to Enabled, Num Lock After Boot tells the computer to turn on Num Lock automatically
on startup, activating the keyboard’s embedded numeric keypad. The default setting is Enabled.
3.2.5 LCD Expansion Mode
When set to Enabled, LCD Expansion Mode allows full-screen views in DOS mode. The default
setting is Disabled.