


8. Geometry Menu
11
11
11
11
11
11
11
11
11
15
14
15
13
15
14
15
12
15
14
15
13
15
14
15
11
14
14
14
14
14
14
14
14
11
15
14
15
13
15
14
15
12
15
14
15
13
15
14
15
11
13
13
13
13
13
13
13
13
11
15
14
15
13
15
14
15
12
15
14
15
13
15
14
15
11
14
14
14
14
10
14
14
14
11
15
14
15
13
15
14
15
12
15
14
15
13
15
14
15
11
12
12
12
12
10
12
12
12
11
15
14
15
13
15
14
15
12
15
14
15
13
15
14
15
11
14
14
14
11
14
14
14
14
11
15
14
15
13
15
14
15
12
15
14
15
13
15
14
15
11
13
13
13
13
13
13
13
13
11
15
14
15
13
15
14
15
12
15
14
15
13
15
14
15
11
14
14
14
14
14
14
14
14
11
15
14
15
13
15
14
15
12
15
14
15
13
15
14
15
11
11
11
11
11
11
11
11
11
10
10
10
10
10
10
10
10
10
10
10
10
10
10
10
10
1
2
1
2
3
2
1
2
1
4
4
4
6
5
6
4
4
6
5
6
4
4
4
5
5
7
7
7
7
7
7
7
7
7
7
7
7
7
7
7
7 9
9 9
99 9
9
9
9
9
9
99
9
9
9
88
8
8
8
8
88
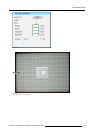
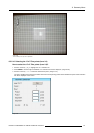
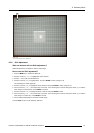
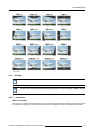
Image 8-112
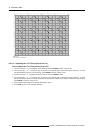
17x17 Local (Level 15) selections
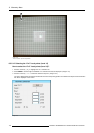
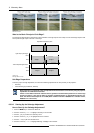
8.5.5.13 Adjusting the 17x17 Local points (Level 15)
How to adjust the 17x17 Local points (Level 15)?
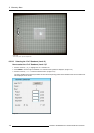
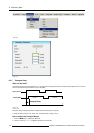
1. Push the cursor key ↑ or ↓ to highlight the Pixels X edit box and press ENTER to select. (image 8-113)
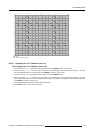
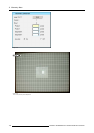
2. Use the cursor key ← or → , the numeric keys on the RCU, or the local keypad, to edit and change the values, e.g. to coarse
shift the selected Local points in a horizontal way. Press ENTER to continue. (image 8-114)
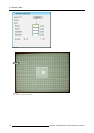
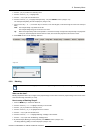
3. Push the cursor key ↑ or ↓ to highlight the Pixels Y edit box and press ENTER to select.
4. Use the cursor key ← or → , the numeric keys on the RCU, or the local keypad, to edit and change the values, e.g. to coarse
shift the selected Local points in a vertical way (Follow this procedure in a similar way to adjust any desired Local point position).
Press ENTER to continue. (image 8-115)
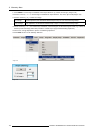
5. Use the subpixel adjustments to fine shift the selected Local points.
6. Press BACK to return to the Geometry Edit menu.
R5976870 BARCOREALITY SIM 5PLUS/SIM 5R 04/04/2007
135