


B. Scheimpflug Lens Adjustment
B. SCHEIMPFLUG LENS ADJUSTMENT
The Scheimpflug Lens Version is available as an option.
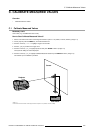
B.1 Introduction
Why performing the Scheimpflug Adjustment?
Scheimpflug Adjustment is needed If an image is still unsharp, even after the focus adjustment.
This means the image lies in a plane which is not parallel to the screen plane, as the deviation betwe
en the image plane and the
screen plane can be in both the Top-Bottom and Left-Right directions, it is necessary to proceed in two distinct steps in following
order).
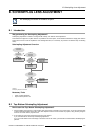
Scheimpflug Adjustment Overview
Scheimpflug
Adjustment
Top-Bottom
Scheimpflug
Adjustment
No
Yes
Image is sharp
everywhere?
Scheimpflug
Adjustment
is not necessary
Centre-Top
of the image
is focused in front
of the screen?
No
Yes
Centre-Top
Scheimpflug
Adjustment
Centre-Bottom
Scheimpflug
Adjustment
Left-Right
Scheimpflug
Adjustment
Centre-Left
of the image
is focused in front
of the screen?
No
Yes
Centre-Left
Scheimpflug
Adjustment
Scheimpflug
Centre-Right
Adjustment
Image B-1
Scheimpflug Adjustment Overview
Necessary Tools
• Piece of white cardboard.
• Open ended spanner 8 mm.
B.2 Top–Bottom Scheimpflug Adjustment
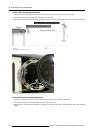
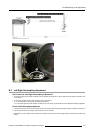
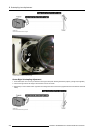
How to start the Top–Bottom Scheimpflug Adjustment?
1. Find out whether the centre-
top or centre-bottom area of the image is focused in front of the screen. To do this, hold the piece
of white cardboard parallel to the screen plane and displace it from the screen towards the projector, along the line joining the
centre of the screen and the projection lens.
2. Is the centre-top area of the image focused in front of the screen?
If yes, Proceed with the Centre–Top Scheimpflug Adjustment.
If no, The centre-bottom area of the image is focused in front of the screen, proceed with the Centre–Bottom Scheimpflug Ad-
justment.
R5976870 BARCOREALITY SIM 5PLUS/SIM 5R 04/04/2007
223