


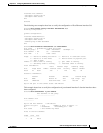

22-7
Software Configuration Guide—Release 15.0(2)SG
OL-23818-01
Chapter 22 Configuring EtherChannel and Link State Tracking
Configuring EtherChannel
These sections describe Layer 3 EtherChannel configuration:
• Creating Port Channel Logical Interfaces, page 22-7
• Configuring Physical Interfaces as Layer 3 EtherChannels, page 22-7
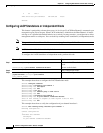
Creating Port Channel Logical Interfaces
Note To move an IP address from a physical interface to an EtherChannel, you must delete the IP address from
the physical interface before configuring it on the port channel interface.
To create a port channel interface for a Layer 3 EtherChannel, perform this task:
This example shows how to create port channel interface 1:
Switch# configure terminal
Switch(config)# interface port-channel 1
Switch(config-if)# ip address 172.32.52.10 255.255.255.0
Switch(config-if)# end
This example shows how to verify the configuration of port channel interface 1:
Switch# show running-config interface port-channel 1
Building configuration...
Current configuration:
!
interface Port-channel1
ip address 172.32.52.10 255.255.255.0
no ip directed-broadcast
end
Switch#
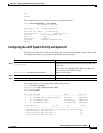
Configuring Physical Interfaces as Layer 3 EtherChannels
To configure physical interfaces as Layer 3 EtherChannels, perform this task for each interface:
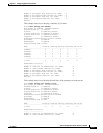
Command Purpose
Step 1
Switch(config)# interface port-channel
port_channel_number
Creates the port channel interface. The value for
port_channel_number can range from 1 to 64.
Step 2
Switch(config-if)# ip address ip_address mask
Assigns an IP address and subnet mask to the
EtherChannel.
Step 3
Switch(config-if)# end
Exits configuration mode.
Step 4
Switch# show running-config interface
port-channel port_channel_number
Verifies the configuration.
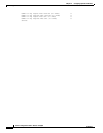
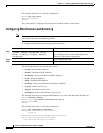
Command Purpose
Step 1
Switch(config)# interface {fastethernet |
gigabitethernet | tengigabitethernet} slot/port
Selects a physical interface to configure.
Step 2
Switch(config-if)# no switchport
Makes this a Layer 3 routed port.