


37-62
Software Configuration Guide—Release 15.0(2)SG
OL-23818-01
Chapter 37 Configuring Quality of Service
Configuring Auto-QoS on Supervisor Engines II-Plus, II+10GE, IV, V, V-10GE, 4924, 4948, and 4948-10GE
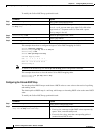
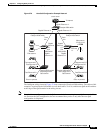
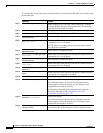
To configure the switch at the edge of the QoS domain to prioritize the VoIP traffic over all other traffic,
perform this task:
Command Purpose
Step 1
Switch# debug auto qos
Enables debugging for auto-QoS. When debugging is enabled,
the switch displays the QoS configuration that is automatically
generated when auto-QoS is enabled.
Step 2
Switch# configure terminal
Enters global configuration mode.
Step 3
Switch(config)# cdp enable
Enables CDP globally. By default, CDP is enabled.
Step 4
Switch(config)# interface
fastethernet2/3
Enters interface configuration mode.
Step 5
Switch(config-if)# auto qos
voip cisco-phone
Enables auto-QoS on the interface, and specifies that the interface
is connected to a Cisco IP phone.
The CoS labels of incoming packets are trusted only when the
Cisco IP phone is detected.
Step 6
Switch(config)# interface
fastethernet2/5
Enters interface configuration mode.
Step 7
Switch(config)# auto qos voip
cisco-phone
Enables auto-QoS on the interface, and specifies that the interface
is connected to a Cisco IP phone.
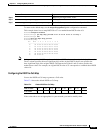
Step 8
Switch(config)# interface
fastethernet2/7
Enters interface configuration mode.
Step 9
Switch(config)# auto qos voip
cisco-phone
Enables auto-QoS on the interface, and specifies that the interface
is connected to a Cisco IP phone.
Step 10
Switch(config)# interface
gigabit1/1
Enters interface configuration mode.
Step 11
Switch(config)# auto qos voip
trust
Enables auto-QoS on the interface, and specifies that the interface
is connected to a trusted router or switch.
Step 12
Switch(config)# end
Returns to privileged EXEC mode.
Step 13
Switch# show auto qos
Verifies your entries.
This command displays the auto-QoS configuration that is
initially applied; it does not display any user changes to the
configuration that might be in effect.
For information about the QoS configuration that might be
affected by auto-QoS, see the “Displaying Auto-QoS
Information” section on page 37-60.
Step 14
Switch# show auto qos
interface interface-id
Verifies your entries.
This command displays the auto-QoS configuration that was
initially applied; it does not display any user changes to the
configuration that might be in effect.
Step 15
Switch# copy running-config
startup-config
Saves the auto qos voip interface configuration commands and
the generated auto-QoS configuration in the configuration file.