


3-11
Cisco uBR7225VXR Universal Broadband Router Hardware Installation Guide
OL-17309-02
Chapter 3 Installing the Cisco uBR7225VXR Router
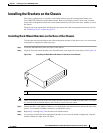
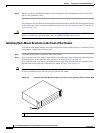
Installing the Brackets on the Chassis
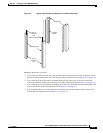
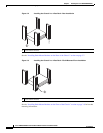
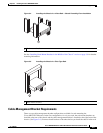
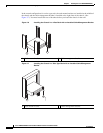
Caution Because the brackets support the weight of the entire chassis, be sure to use all of the required slotted
screws to fasten the two rack-mount brackets to the rack posts. Figure 3-2 on page 3-4, Figure 3-3 on
page 3-4, Figure 3-4 on page 3-5, and Figure 3-5 on page 3-5 show typical installations in 19-inch,
four-post and telco-type equipment racks.
Warning
Two people are required to lift the chassis. Grasp the chassis underneath the lower edge and lift with
both hands. To prevent injury, keep your back straight and lift with your legs, not your back. To prevent
damage to the chassis and components, never attempt to lift the chassis with the handles on the
power supplies or on the interface processors, or by the plastic panels on the front of the chassis.
These handles were not designed to support the weight of the chassis.
Statement 5
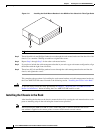
To install the chassis in the rack, complete the following steps:
Step 1 On the chassis, ensure that all captive installation screws on the network processing engine, each
cable interface line card, and each power supply are tightened.
Step 2 Make sure that your path to the rack is unobstructed. If the rack is on wheels, ensure that the brakes are
engaged or that the rack is otherwise stabilized.
Caution Two people should perform Step 3 through Step 6.
Step 3 Position the chassis so that the front end is closest to you; then lift the chassis and move it to the rack.
To prevent injury, avoid sudden twists or moves.
Step 4 Slide the chassis into the rack, pushing it back until the brackets (installed at the front or rear of the
chassis) meet the mounting strips or posts on both sides of the equipment rack.
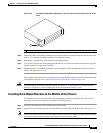
Note The rack-mount bracket must be placed behind the rack post or mounting strip in the rear installation
configuration. (See Figure 3-2 on page 3-4.)
Step 5 While keeping the brackets flush against the posts or mounting strips, position the router so that the holes
in the brackets are aligned with those in the mounting strips.
Warning
To prevent bodily injury when mounting or servicing this unit in a rack, you must take special
precautions to ensure that the system remains stable. The following guidelines are provided to
ensure your safety:
Statement 1006
• This unit should be mounted at the bottom of the rack if it is the only unit in the rack.
• When mounting this unit in a partially filled rack, load the rack from the bottom to the top with
the heaviest component at the bottom of the rack.
• If the rack is provided with stabilizing devices, install the stabilizers before mounting or servicing
the unit in the rack.