


PCA, Paper Size
1 Remove the following components in the order listed:
• Toner Cartridge
• Trays 2 and 3
• Back Cover (see Figure 6-4)
• LVPS (see Figure 6-41)
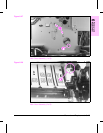
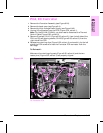
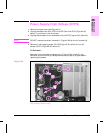
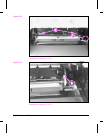
2 Unplug the fan cable from the left side of the connector (Figure 6-37, callout
1), remove (1) screw, CH102 (Figure 6-37, callout 2), and remove the plastic
shield (Figure 6-37, callout 3).
Note
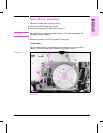
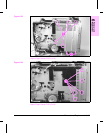
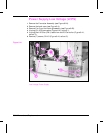
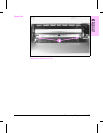
The Paper Size PCA for Tray 2 (Figure 6-38, callout 4) is identical to the
PCA for Tray 3 (Figure 6-38, callout 5). The removal procedure for both
PCAs is the same.
3 Unplug the connector (Figure 6-38, callout 6), remove (3) screws, CH101
(Figure 6-38, callout 7), and remove the PCA and actuating fingers.
To Reinstall:
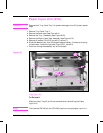
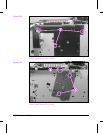
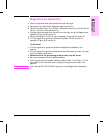
Make sure that the actuating fingers are aligned with the locating pins
(Figure 6-39, callout 8).
Paper Size PCA (1 of 3)
Figure 6-37
6
Removal and
Replacement
Removal and Replacement 6-51