


Tray 4 Adjustment Procedure
In some cases, the registration from Tray 4 (HCI) causes print to start too
close to the edge of the paper. This situation is not a typical occurrence. In
most cases the Tray 4 offset is fine. Although this may or may not be within
specification, it is unacceptable to some users. Perform the following
adjustment procedure to correct the situation.
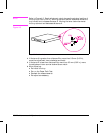
1 With the HCI stand-alone, remove left, right and rear covers from the HCI.
2 Remove the vertical transfer unit.
3 Open the HCI paper tray.
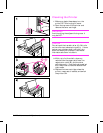
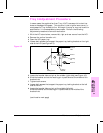
4 Loosen both screws that support the paper tray locking bracket on the right
side of the HCI (see Figure 4-3).
5 Locate the bracket hole and pin at the middle (right side) (see Figure 4-3).
6 Slide the bracket so that the locating pin is positioned at the middle of the
bracket hole.
7 Tighten both screws.
8 Loosen both screws that support the paper tray locking bracket on the left
side of the HCI.
9 Locate the bracket hole and pin at the middle (left side).
Slide the bracket so the locating pin is positioned at the middle of the
bracket hole.
(continued on next page)
Locking
Bracket
Hole
Screw 1
Locating
Pin
Screw 2
HCI
Closing Lever
Locking
Bracket
Figure 4-3
4
Maintenance &
Adjustments
Maintenance and Adjustments 4-9