


206 MFP disassembly/assembly ENWW
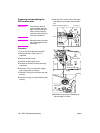
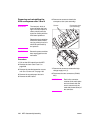
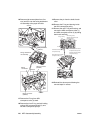
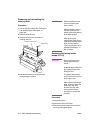
16 Remove eight screws (three front, five
rear) and turn over the fusing attachment
rail assembly to the paper exit side.
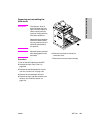
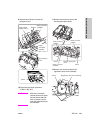
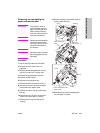
17 Remove the E-ring from ADU
conveyance roller (2) shaft.
18 Remove the front E-ring, two belt holding
collars, ADU conveyance belt (2), and
two ADU conveyance pulleys.
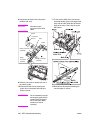
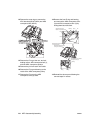
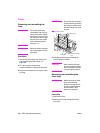
19 Remove the pin from the shaft of each
roller.
20 Remove the E-ring and bearing inside
the ADU conveyance pulley.
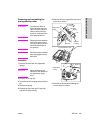
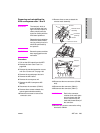
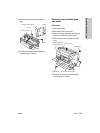
21 Remove the rear E-ring and bearing, and
remove the ADU conveyance roller (1)
and ADU conveyance roller (2) by sliding
them back and forth.
22 Reinstall the above parts following the
removal steps in reverse.
Screws
Relay connector
(CN417)
Fixing attachment
rail assembly
Relay connector
(CN404)
Screws
Relay connector
(CN403)
Wiring
harnesses
Screw
E-ring, bearing
Belt holding collars,
Automatic document feeder
transport pulleys
Pin
E-rings
Pin
Automatic document feeder
conveyance roller (2) shaft
Automatic document feeder
conveyance belt (2)
Automatic document feeder
conveyance roller (2)
Automatic document feeder
conveyance roller (1)
Bearing
E-rings