


Shared Printers
Installation Guide 65
Requirements for Printer Sharing with a Windows Vista Client PC
Before sharing a printer over the network to a Windows Vista Client PC, meet the following
requirements:
• Each PC that uses the printer must have a working network connection. Verify the
network connection is working properly.
• The Windows Vista Client PC can connect to a Host PC running the Windows Vista,
Windows Server 2003, or Windows Server 2008 operating system.
• If more than one printer is connected to a PC (including a shared printer), the printers
must have different names.
• The first user who installs the printer on the Client PC must have Administrator
permission on that PC.
• On the Client PC, the user who prints must be the same as the user who installed the
printer.
• Each user must install the printer separately to be able to print.
• A printer pool cannot be shared.
Printer Sharing for Windows XP or Windows Server 2003
Setting up the Host PC for Windows XP and Windows Server 2003
To set up the Host PC for printer sharing, do the following:
1 Install the printer driver on the Host PC. See "Installing the Driver with Bidirectional
Communication" for more information.
2 With the printer power on, change settings to reflect your card design, including printer
features such as ribbon type and magnetic stripe settings. Record the settings so you
can also make those settings on the Client PC.
3 Change the printer name to meet the following requirements:
— The name of a shared printer is the name you assign plus the server name (which is
added by Windows). The server name is the network name of the Host PC.
— The printer name cannot contain spaces or special characters. Search for “rename
printer” in Windows help for more information.
— For best results, use a name with 8 or fewer characters.
— The printer name, including the server name, must be fewer than 31 characters.
— See Windows help for "printer name" or "computer name" for allowed characters and
naming guidelines.
4 Restart Windows on the Host PC.
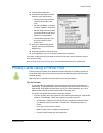
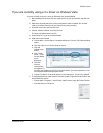
5 Enable the printer for sharing:
a From the Windows Start menu, choose Settings > Printers and Faxes to open the
Printers window.
b Click the printer icon to select it, and then right-click to display the popup menu.
c Choose Sharing from the popup menu to open the Sharing page of the Properties
dialog box for the printer.
d Click the “Share this printer” checkbox and the first 8 characters of the printer name
automatically appears in the Share name box.
e Complete the printer name.