


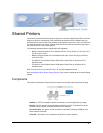


Shared Printers
Installation Guide 68
Printer Sharing for Windows Vista Client PCs
The 4.x Card Printer Driver supports printer sharing on Windows Vista Client PCs, using the
procedures described in this section.
Set Up the Host PC for Printer Sharing on Windows Vista
1 Log in to the Host PC as a user with Administrator permissions.
2 Install the printer driver on the Host PC. See "Installing the Driver with Bidirectional
Communication" for more information.
3 Rename the printer on the Host PC to use a short name with no spaces.
— For best results, use a name with 8 or fewer characters.
— See Windows help for "printer name" or "computer name" for allowed characters and
naming guidelines.
4 Restart Windows on the Host PC and log in as a user with Administrator permissions.
5 Choose Control Panel > Hardware and Sound > Printers to open the Printers window.
6 Click the printer to select it and then right click and choose Sharing from the pop-up
menu. The Properties dialog box opens to the Sharing tab.
7 Click the "Change Sharing Options" button.
8 Click "Continue" on the User Account Control warning.
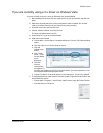
9 Choose "Share this printer." The name assigned in step 3 appears in the Share Name
box. Do not change this name.
10 Clear the "Render Print Jobs on Client Computers" checkbox.
11 Click "Apply" and then "OK" to save the settings and close the box.
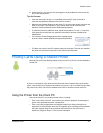
When you share a printer, users at other PCs on the network can see the printer.
Install the Driver on the Client PC
Use this process at the Client PC to install the printer. If more than one Client PC will share the
printer, repeat the procedure at each Client PC.
1 Log in to the Client PC as a user with Administrator permission. For best results, the
username and password should also be defined on the Host PC.
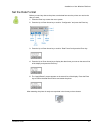
2 Choose Start > Network and expand the Network selection to display the available
networks and computers. If needed, click "Name" in the right-hand pane of the window
to sort names alphabetically.
3 Choose the Host PC and expand the selection to display the printer.
4 If you are prompted, log in to the Host PC with a username and password defined at the
Host PC.
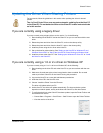
5 Install the printer using Windows File and Printer Sharing.
a Right-click the printer and choose "Connect" from the pop-up menu. A Windows
Printer Installation dialog box is displayed and is automatically replaced by a Printers
dialog box.
b If prompted, click "Install driver" on the Printers dialog box.
c If prompted, click "Continue" on the User Account Control dialog box.
d A Windows Printer Installation dialog box is displayed while the printer in installed. It
closes when printer installation is complete.