


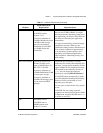


Chapter 1 Required Configuration, Installation, and Upgrade Information
LabVIEW 5.1 Addendum 1-6
©
National Instruments Corporation
Installing LabVIEW
If you are upgrading from an earlier version of LabVIEW, read the
Upgrading to LabVIEW 5.1 section later in this chapter before installing
LabVIEW.
(Windows)
For an introduction to the LabVIEW environment, complete the
LabVIEW Online Tutorial. Launch the tutorial by clicking LabVIEW
Tutorial in the LabVIEW dialog box.
To access the LabVIEW dialog box, either launch LabVIEW or close all
open LabVIEW VIs if you already are running LabVIEW.
(Windows)
When you insert the LabVIEW installation CD, a dialog box
appears, from which you can choose to install LabVIEW, install HiQ, or
run the toolkit demos.
LabVIEW RT
LabVIEW RT works with National Instruments RT Series intelligent DAQ
hardware, and allows you to perform real-time, deterministic data
acquisition and to control applications on Windows PCs. With LabVIEW
RT, you can create embedded VIs that run in real-time on processor-based
RT Series hardware. Combined with the RT Series intelligent DAQ boards,
LabVIEW RT gives you the simple graphical programming of LabVIEW
with proven DAQ technology for a complete, integrated solution for
real-time applications.
If you are installing LabVIEW RT instead of LabVIEW 5.1, refer to the
RT Series Hardware and LabVIEW RT User Manual for complete
installation instructions.
Caution
LabVIEW RT is English only. If you are upgrading from a non-English version
of LabVIEW to LabVIEW RT, your version of LabVIEW will be in English.
Windows
Complete the following steps to install LabVIEW for Windows.
1.
(Windows NT)
Log on to Windows NT as an administrator or as a user
with administrator privileges.
2. If you are installing LabVIEW for Windows 95/98/NT, run
x
:\AUTORUN.EXE, where
x
is the drive letter for your CD-ROM drive.
!