


Appendix A Manual Clarifications and Additions
©
National Instruments Corporation A-5 LabVIEW 5.1 Addendum
contain characters that are invalid on some platforms. By scanning within
LLBs, this tool helps you detect potential problems if you move your files
out of VI libraries.
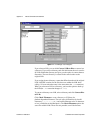
Use the Show dates option at the bottom of the dialog box to display file
modification dates next to each file. You can choose to sort the files
alphabetically or by date and disable files with the same name and date in
both directory listings. Use this technique when comparing two directories
to determine whether any files have changed.
Other General Interface Features
Dragging and Dropping VI Icons—LabVIEW 5.0 simplified the creation
of VI icons. By dragging an image file and dropping it onto the VI icon in
the upper-right corner of a front panel, a 32-by-32 version of the image
replaces the existing icon.
You can drag a VI icon from the icon pane in the upper-right corner to a
block diagram to instantly create a subVI call. By pressing <Shift> while
dragging the VI icon, you automatically wire the non-default values of the
controls as constants for the subVI.
If the subVI already appears in a block diagram, pressing <Shift> while
dragging onto the existing call updates the attached constants. A control at
its default value discards the constant attached to the subVI, and an input
wired to anything other than a constant is unaffected.
When you press <Shift> while double-clicking a subVI icon to open the
subVI front panel, LabVIEW loads the values of the constants wired to
the subVI into the front panel controls. All unwired controls retain the
default values.
You also can use the drag-and-drop technique for global variables and
custom controls. Additionally, you can drag a VI icon into a VI refnum on
a front panel control to load VIs into memory dynamically, which is part of
the VI Server functionality.
Print to RTF/HTML Feature—The Print to RTF/HTML feature can
export graphics in uncompressed graphics interchange format (GIF). To
use this feature, select File»Print Documentation, and select RTF File or
HTML File from the Destination pull-down menu.