


TOSHIBA
4 - 8
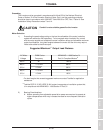
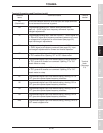
ST FM AM CC CC RX PP IV FP FLC FLB FLA
P24 RES RR F R S1 S2 S3 S4
RCH
A
RCH
C
LOW
A
LOW
C
dry contact (stop/start)
Terminal Block
<
>
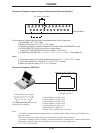
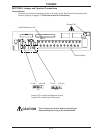
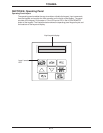
(5) (4) (3) (2) (1)
(9) (8) (7) (6)
6 5 4 3 2 1
( facing front of G3 )
Pinout for DB-9 on computer
Pinout for G3 RJ11 RS232 port
( looking head-on at male connector
that plugs into computer )
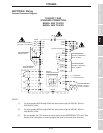
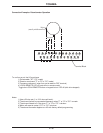
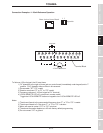
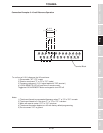
Connection Examples: Keypad Frequency Reference and Remote Stop/Start
To follow a local (keypad) reference with a remote stop/start, the H3 must have:
1) Drive enable ("ST"-"CC" made)
2) Direction command ("F" or "R" to "CC" made)
3) Frequency reference: Adjust on keypad with arrows. Press READ/WRITE to enter.
4) LOCAL/REMOTE LED off ( puts drive in remote mode)
Toggle the LOCAL/REMOTE button on keypad to turn LED off.
5) Programming: Set Item 282, FREQUENCY MODE SELECTION to "2". See page 8-28.
Notes:
1) The drive will accel to the commanded frequency when "F" or "R" to "CC" is made.
2) The drive will decel to 0.0 Hz when "F" or "R" to "CC" is broken.
3) Motor will coast to a stop if "ST" to "CC" is broken.
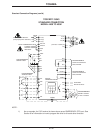
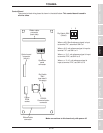
Connection Examples: RS232 Port
Connect DB9 pin 5 to RJ11 pin 3
Connect DB9 pin 3 to RJ11 pin 4
Connect DB9 pin 2 to RJ11 pin 2
Connect DB9 pin 7 to RJ11 pin 6
Connect DB9 pin 8 to RJ11 pin 1
Short DB9 pin 6 to DB9 pin 4
DB9 pin 1 and 9 and RJ11 pin 5 not used
Notes:
1) Free RS232 programming/monitoring software is available from Toshiba. Contact your distributor for a
copy and manual.
2) Do not insert/remove the phone plug into/from the H3 port when drive is powered.
3) Common 6 conductor phone cord can be used with an adaptor (6 conductor RJ11 female to DB9 female).
The adapter is available from your Toshiba distributor or local electrical supply house.
4) "ST"-"CC" must be made.