


4-11
4
Checking internal connections
Checking internal connections
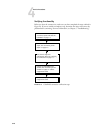
The most common causes of hardware problems are faulty and loose connections. Before
you conclude that any board or component has failed, remove, inspect, and reseat all
appropriate connections, and then check whether the problem still occurs.
TO CHECK BOARD AND CABLE CONNECTIONS
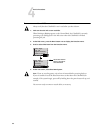
NOTE: Follow standard ESD precautions while servicing internal components.
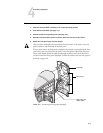
1. Make sure you have powered off the ColorPASS (see page 4-4), removed all the cables
from the back panel, and removed the left side panel (see page 4-5).
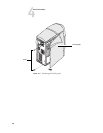
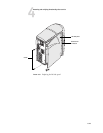
2. Position the ColorPASS so it is resting on its side and the internal components are
facing up.
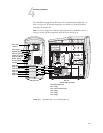
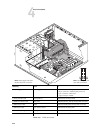
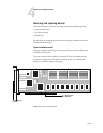
3. Inspect the boards to make sure they are firmly seated in their motherboard connectors.
Press down firmly on the boards to make sure each one is securely installed.
The standard board configuration includes the following (from top to bottom):
Connector PCI1—Empty
Connector PCI2—Copier interface board
Connector PCI3—Empty
Connector PCI4—Empty
Connector PCI5—Empty
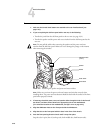
4. Inspect ribbon cables to see if they are intact.
Faulty ribbon cables are easily overlooked. Check the contact point between the cable
and the connector to ensure that they have not separated. If a ribbon cable appears
damaged, substitute it with a tested cable.
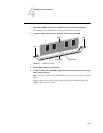
5. Make sure that all ribbon cables and power supply cables are seated properly on
connectors (see Figure 4-6 on page 4-12).
Cable connectors are keyed to fit only when properly oriented.
6. Make sure that the power, reset, and speaker cables are connected properly to the
motherboard. (For connector locations, see Figure 4-15 on page 4-23.)
Make sure that pin 1 of the speaker cable connector (marked with a triangle) corresponds
to pin 1 of the motherboard SPKER connector (see Figure 4-15 on page 4-23).
7. Check the front panel fan cable and the CPU fan cable connections to the motherboard.
Gently straighten any bent pins with a pair of needlenose pliers. If, after tightening the
connections, you are still experiencing problems, it may be that one or more components
are still not getting power. If this is the case, see “Checking voltages” on page 4-43.