


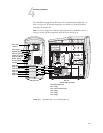

4-5
4
Accessing components
TO OPEN THE COLORPASS
1. Make sure you have powered off the ColorPASS (see page 4-4) and removed all the cables
from the back panel.
2. Place the ColorPASS in its normal operating position on a flat, antistatic surface.
Attach an ESD wrist strap before handling internal parts (see “Precautions” on
page xiii).
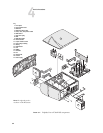
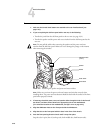
3. Determine the panel(s) to remove according to the component(s) you want to access:
• Left side panel only—Copier interface board; DIMM(s); CPU and CPU cooling
assembly; HDD and DVD drive ribbon cables; fan; power supply
and power cables; HDD.
• Left, right, and front panels—User interface board; Control Panel buttons; front
panel; jewel; reset and power cables and switches; speaker; DVD drive; motherboard.
(To remove the motherboard, you need to slide the DVD drive a few inches out the
front of the chassis.)
NOTE: If you need to replace the top panel or the plastic piece of a side panel
(for example, if the plastic piece is damaged), follow the procedures in Appendix B,
“Replacing top and side plastics.”
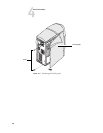
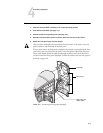
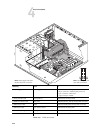
4. Remove the two screws that secure the side panel(s) to the chassis (see Figure 4-2 on
page 4-6).
5. Remove the side panel(s) from the chassis.
Side panels pivot on the rounded front corners of the chassis. To remove a side panel,
swing the back edge away from the chassis, and then lift the side panel off the chassis
(see Figure 4-2).
Make sure not to strike the latch on the HDD bracket (inside the chassis) as you move
the left side panel away from the chassis. Pivot the panel several inches away from the
system before you lift it off the chassis.