


4-18
4
Service Procedures
TO REMOVE THE COPIER INTERFACE BOARD
1. Shut down and open the ColorPASS (see page 4-4 and page 4-5).
2. Make sure the copier interface cable is removed from the back of the ColorPASS.
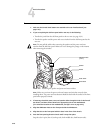
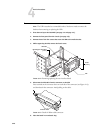
3. Remove the board mounting bracket screw from back panel slot 3.
4. Remove the reusable tie wrap that attaches the board extender to the board guide.
Do not cut the tie wrap. Squeeze the tab to unlock it, and then open it completely and
remove it. You will reattach the tie wrap later when you replace the copier interface
board.
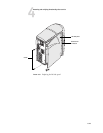
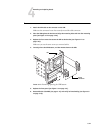
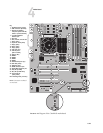
5. Remove the copier interface board from motherboard connector PCI2.
Grasp the board at the front and back edge and gently pull the board straight out of its
motherboard connector.
6. Place the board in an antistatic bag.
TO REPLACE THE COPIER INTERFACE BOARD
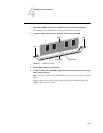
1. If you are replacing the old copier interface board with a new one, unpack the new board
and attach the plastic board extender with the screws provided.
Mount the board extender on the component side of the copier interface board.
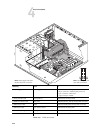
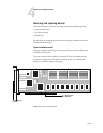
2. Reseat the copier interface board in connector PCI2 on the motherboard and secure it at
back panel slot 3 with the mounting bracket screw you removed earlier.
The copier interface board connector is keyed to fit only when properly oriented.
3. Locate the reusable tie wrap you removed earlier and use it to secure the board extender
to the board guide.
Use the tie wrap you removed earlier if it is a reusable type. Otherwise, use a new one.
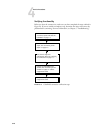
4. Reassemble the ColorPASS and verify its functionality (see page 4-14).