


8-17
Catalyst 2950 and Catalyst 2955 Switch Software Configuration Guide
OL-10101-02
Chapter 8 Configuring Switch-Based Authentication
Controlling Switch Access with RADIUS
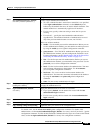
Beginning in privileged EXEC mode, follow these steps to enable TACACS+ accounting for each
privilege level and for network services:
To disable accounting, use the no aaa accounting {network | exec} {start-stop} method1... global
configuration command.
Displaying the TACACS+ Configuration
To display TACACS+ server statistics, use the show tacacs privileged EXEC command.
Controlling Switch Access with RADIUS
This section describes how to enable and configure the RADIUS, which provides detailed accounting
information and flexible administrative control over authentication and authorization processes.
RADIUS is facilitated through AAA and can be enabled only through AAA commands.
Note For complete syntax and usage information for the commands used in this section, see the Cisco IOS
Security Command Reference for Cisco IOS Release 12.
This section contains this configuration information:
• Understanding RADIUS, page 8-17
• RADIUS Operation, page 8-19
• Configuring RADIUS, page 8-19
• Displaying the RADIUS Configuration, page 8-31
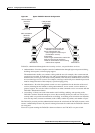
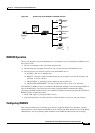
Understanding RADIUS
RADIUS is a distributed client/server system that secures networks against unauthorized access.
RADIUS clients run on supported Cisco routers and switches. Clients send authentication requests to a
central RADIUS server, which contains all user authentication and network service access information.
Command Purpose
Step 1
configure terminal Enter global configuration mode.
Step 2
aaa accounting network start-stop
tacacs+
Enable TACACS+ accounting for all network-related service requests.
Step 3
aaa accounting exec start-stop tacacs+ Enable TACACS+ accounting to send a start-record accounting notice at
the beginning of a privileged EXEC process and a stop-record at the end.
Step 4
end Return to privileged EXEC mode.
Step 5
show running-config Verify your entries.
Step 6
copy running-config startup-config (Optional) Save your entries in the configuration file.