


13-5
Cisco BPX 8600 Series Installation and Configuration
Release 9.3.10, Part Number 78-11603-01 Rev. D0, July 2001
Chapter 13 Installing the BPX Switch Cards
Installing the Cards
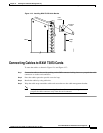
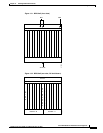
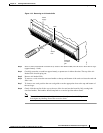
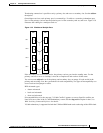
Figure 13-3 Removing an Air Intake Grille
Step 3
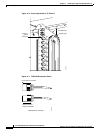
Insert a small slotted blade screwdriver (0.20/0.25 inch blade width) into the access hole until it stops
(approximately 1 inch).
Step 4 Carefully rotate the screwdriver approximately a quarter turn in either direction. The top of the Air
Intake Grille should spring out.
Step 5 Remove Air Intake Grille.
Step 6 To remove a card, rotate the extractor handles at the top and bottom of the card to release the card and
slide it out.
Step 7 To insert a new card, position the rear card guides over the appropriate slots at the top and bottom of
the card cage.
Step 8 Gently slide the card in all the way to the rear of the slot and seat the board by fully seating both
extractor handles. The handles should snap back to a vertical position when seated.
Note The card should slide in with slight friction on the adjacent board’s EMI gaskets.
Investigate any binding. Do not use excessive force.
Latch
Access
hole
Released
air intake
grill
H7997
Power
supply