2-11
Cisco uBR7200 Series Universal Broadband Router Software Configuration Guide
OL-2239-03
Chapter2 Configuring the Cable Modem Termination System for the First Time
Configuring the Cisco uBR7200 Series Using AutoInstall
Understanding AutoInstall
Once the requirements for using AutoInstall are met, the dynamic configuration of the new router occurs
as follows:
1. The new router acquires its IP address. Depending on the interface connection between the two
routers and/or access servers, the new router's IP address is dynamically resolved by either SLARP
requests or BOOTP or RARP requests.
2. The new router resolves its name through network-confg, cisconet.cfg, or DNS.
3. The new router automatically requests and downloads its configuration file from a TFTP server.
4. If a host name is not resolved, the new router attempts to load router-confg or ciscortr.cfg.
Preparing for the AutoInstall Process
Complete the following steps to prepare your CiscouBR7200series CMTS router for the AutoInstall process:
Step1 Attach the appropriate synchronous serial cable to the synchronous serial interface0 on the router.
Step2 Turn the power switch on each power supply to the ON (|) position. This action turns on power to the
router.
The router loads the operating system image from Flash memory; this process can take several minutes.
If the remote end of the WAN connection is connected and properly configured, the AutoInstall process
begins.
Step3 When the AutoInstall process is completed, use the copy running-config startup-config command to
write the configuration data to the router’s nonvolatile random-access memory (NVRAM):
Router# copy running-config startup-config
Completing this step saves the configuration settings that the AutoInstall process created to NVRAM. If
you fail to do this, your configuration will be lost the next time you reload the router.
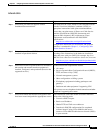
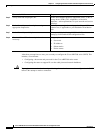
Step4 Choose your preferred method to verify the required file configurations for the AutoInstall Facility:
Step5 If the existing router is to help install the new router automatically via an HDLC-encapsulated serial
interface using Serial Line Address Resolution Protocol (SLARP), that interface must be configured
with an IP address whose host portion has the value 1 or 2. (AutoInstall over Frame Relay does not have
this address constraint.) Subnet masks of any size are supported.
Task Description
a. Verify that the configuration file is
on the TFTP server.
Complete this task first (required). Verify that a configuration file
for the new router resides on a TFTP server. This file can contain
the full or minimum-required configuration for the administrator
to Telnet into the new router (for configuration using Autoinstall).
Note In addition, complete one of the following two tasks.
b. Verify that a file named
network-confg also resides on the
TFTP server.
Complete this task, or task c. In this task, verify that the
network-confg file on the TFTP server has an Internet Protocol
(IP) host name entry for the new router. The TFTP server must be
reachable from the new router.
c. Add IP-address-to-host name
mapping to a DNS database file.
Complete this task, or task b. In this task, add an IP address-to-host
name mapping for the new router to a Domain Name System
(DNS) database file on the TFTP server.


