


Installing System Board Options 8-7
Performing a Memory Upgrade
Use the following procedure to perform a memory
upgrade:
1. Remove the left computer cover.
See “Removing the Computer Covers” in Chapter 7.
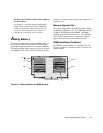
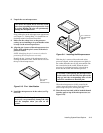
2. Remove the support panel.
Remove the two screws from the support panel (see
Figure 7-4) and pull the back edge tabs on the panel
out of the slots in the chassis.
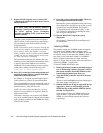
3. Remove the memory module.
Hold the module by the corners where the handles
are and carefully pull the module out until the edge
connectors are free from the system board connector.
NOTE: Be careful not to touch components or gold
edge connectors on the module.
4. Place the memory module component-side up
onto an antistatic surface.
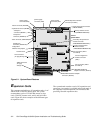
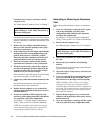
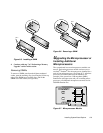
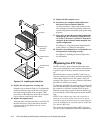
5. Locate the SIMM sockets into which you will
install or replace SIMMs.
Figure 8-4 shows the location of the SIMM sockets
on the memory module.
6. Install or replace the SIMMs as necessary to
reach the desired memory total.
Follow the instructions in “Installing SIMMs” or
“Removing SIMMs” later in this section, as
appropriate.
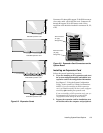
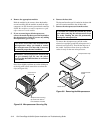
7. Replace the memory module.
Hold the module by the corners with the SIMM
sockets facing down. Ease the module into the cor-
rect slot guides until it is touching the system board
connector. Press the module carefully but firmly into
the system board connector and rotate the handles
closed.
NOTE: Before closing the handles, make sure the
memory module is aligned with the system board
connector.
8. Replace the support panel.
Align the panel so that the two tabs are to the left. Fit
the tabs into the two slots on the chassis back and
swing the panel closed. Replace the two screws
removed in step 2.
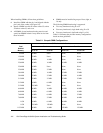
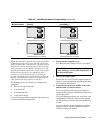
1152 MB 128 MB 128 MB 16 MB 16 MB
1280 MB 32 MB 32 MB 128 MB 128 MB
1280 MB 128 MB 128 MB 32 MB 32 MB
1536 MB 64 MB 64 MB 128 MB 128 MB
1536 MB 128 MB 128 MB 64 MB 64 MB
2 GB 128 MB 128 MB 128 MB 128 MB
Table 8-1. Sample SIMM Configurations
(continued)
SIMMs Installed in Sockets
Total
Desired
Memory
Bank 1 Bank 2
J1 to J4 J5 to J8 J9 to J12 J13 to J16
CAUTION: See “Protecting Against Electro-
static Discharge” in the safety instructions at
the front of this guide.