


Paper and Ribbon
1
ADJUSTING THE GAP BETWEEN
i
THE PRINT HEAD AND PLATEN
.
Gemini printers can accommodate papers of varying thicknesses
by allowing you to change the print-head gap. This “gap” is the
distance between the print head and the platen.
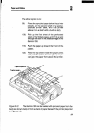
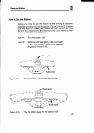
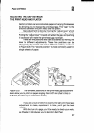
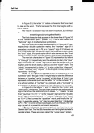
Gap adjustment is done by moving the “adjust lever:’ which
is immediately in front of the “release lever” (see Figure 2-18).
Pulling the “adjust lever” forward will widen the gap, and pushing
it backward will make the print-head gap narrower.
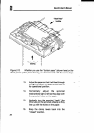
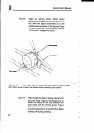
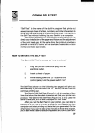
There are five positions that can be attained by moving the
lever to different adjustments. These five positions can be
changed by the control arm rest in different notches, as shown
in Figure 2-20. The “second position” is most commonly used for
single sheets of paper.
Figure Z-20.
The different positions of the print-head gap-adjustment
/ever allow you to print on paper ranging from 0.07 mm (that’s thin) to
0.28 mm (for three-layer carbonless forms).
If you are unsure of which is exactly the right print-head gap
adjustment to make, experiment. In time, you’ll get the best
results.
With the turn of a page, you’ll be ready to check your work,
as Chapter 3 introduces you to Gemini’s Self-Test.
37